
How to install wordpress Blog to online store
For one thing, Google treats a subdomain like a completely separate entity from your main site. As a result, your subdomain WordPress blog would not build any domain strength for your root domain.
From an SEO(search engine optimization) standpoint, it’s better to install a WordPress blog in a subdirectory as opposed to a subdomain, but unfortunately we can’t do that with Shopify or Big Commerce.
On the flip side, if you use Shopify or BigCommerce’s native blogging platform, you would receive all of the SEO benefits of having a blog on the same domain as your shop but at the expense of a very limited platform.
For a lot of people, this is a difficult decision to make.
For me personally, I recommend that you install a WordPress blog in a subdomain of your main shop. Here’s why.
WordPress Is So Much More Flexible

WordPress has thousands of plugins at your disposal that make running a fully featured website infinitely easier than the limited blogging functionality that Shopifyor Big Commerce provides.
For example, there are plugins available for EVERYTHING you can think of.
Let’s say you want to create a nice squeeze page to easily collect email addresses. There’s a plugin for that.
Let’s say you want to add a very specialized contact form for your site. There’s a plugin for that.
Let’s say you want to create a little membership site for your ecommerce store. There’s a plugin for that.
In reality, WordPress is much more than a blogging platform because there are so many add ons available that extend its functionality.
Shopify and BigCommerce are great for handling orders and transactions but lousy for everything else.
The other reason I don’t recommend running a blog on Shopify or BigCommerce is because there’s no way to migrate your blog off of their platform. In other words you’re stuck.
Unsurprisingly, Shopify offers a plugin that will migrate a WordPress blog to Shopify but not the other way around. Go figure!
How to Add A WordPress Blog to Shopify Or BigCommerce

As I mentioned earlier, in order to install a WordPress blog onto Shopify or Big Commerce, you will need to create a separate subdomain for your blog.
In addition, you’ll need to sign up for a webhost to host your blog. Right now, I recommend Blue Host for this purpose.
Most of you probably already know this, but I ran my online store on Blue Host for over 2 years and they were fantastic.
And the best part is that they only cost $3.49 a month! (This is a special rate negotiated for MyWifeQuitHerJob.com readers. The regular price is $7.99)
Chances are in the beginning, you will not need anything more powerful than a shared host and Blue Host is an inexpensive and powerful solution.
Below are detailed instructions on how to install a WordPress blog onto an existing Shopify or BigCommerce store using Blue Host as your webhost.
Step #1: Sign Up For Webhosting
Instructions How To Sign Up


- Go To The Blue Host Website
- Click On The “Get Started Now” Button.

- Select A Plan
If you’re just starting out, just go with the cheapest plan which will be fine until you reach about 1000 visits per day.
- Type In Your Domain.Note: If you already have a domain for your ecommerce store, type in your exact same domain.For example, if my Shopify ecommerce store resides at bumblebeelinens.com, I would type in bumblebeelinens.com as the domain.If you plan on hosting your blog on a completely different domain, then Blue Host will give you a domain for free.

- Enter Your Account And Billing Information.
- Choose Your Hosting Package. You will be given a choice of 12 months, 24 months or 36 months. The longer the time frame, the cheaper it will be.


- Make sure you unclick all the stuff you don’t need. Trust me. You don’t need SiteLock Domain Security, Site Backup Pro or Search Engine Jumpstart
- Click Next. You will receive a confirmation in your email.
Step 2: Create A Subdomain For Your Blog
This step is only necessary if you plan on installing your WordPress blog on a subdomain from your Shopify or BigCommerce store. If you simply plan on installing a blog on a completely separate domain, then skip this step.
- Log in to your Blue Host account. Note: You should have received an email with your user id/password information. If you can’t find the login link, Click Here
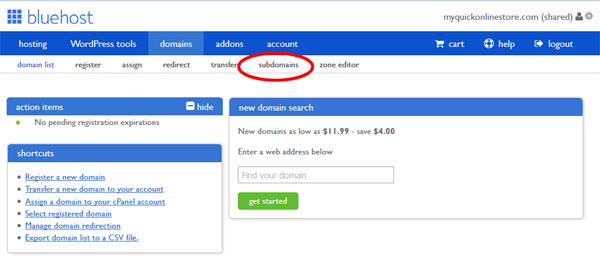
- Click On The “Domain Manager” Button

- Click On The “Subdomains” Button

- Add A Blog Subdomain
In this example, I’m adding the blog.yourdomain.com subdomain.
- Congrats! You Added A Subdomain!

- Grab The Subdomain IP Address
Because we are pointing blog.yourdomain.com to BlueHost, we need to grab the ip address.Navigate to Domains->Zone Editor in your BlueHost control panel.Then copy down the following ip address (We’ll need it later). In this example, the ip address for the subdomain is 50.87.248.203


Step 2: Install WordPress
WordPress is by far the most popular blogging platform out there. And the best part is that you can install WordPress in a matter of just a few clicks on Blue Host
- Go Back To Your Bluehost Control Panel Front Page. If you forgot how to get to your control panel, Click Here
- Click the icon that reads “One Click Installs” under the “Website” section in your cPanel.

- Select WordPress To Be Installed

- Click on the “Install” button

- Enter Your Domain

- Enter In Your Blog Username And Password

- Click “Install”. Now WordPress has been uploaded to your subdomain!


Step 3: Modify The DNS Records – Point Your Subdomain At Your New WordPress Blog
If you already have a Shopify or BigCommerce store installed at yourdomain.com, then you aren’t done yet!
Right now your main domain is pointing at your shop hosted on Shopify or BigCommerce, but you still need to point your subdomain, “blog.yourdomain.com”, to your newly installed WordPress blog on BlueHost.
Note:If you were simply installing a blog on a brand new domain, you don’t need this step. You should be able to access your blog immediately. Bluehost will email you specific instructions on how to do this.
This is where things get a little bit technical.
Remember, right now you have Shopify setup on your main domain which means that the DNS (domain name server) record for your domain is pointed at Shopify.
In order to point ‘blog.yourdomain.com’ to your WordPress blog, you need to add a new DNS record that tells the browser to look at Bluehost only if someone navigates to the subdomain (ie. your blog).
In order to do that, you will need to access your domain registrar where you purchased the domain and add an “A record” to tell everyone where to access your new WordPress blog at blog.yourdomain.com.
Since I have all of my domains registered at Go Daddy, I’ll use them as an example.
Step By Step Instructions
- Go To GoDaddy’s Page, Login And Click On “Manage Your Domains

- Select The Desired Domain And Click On “DNS Zone File”

- Click On The “Add Record” Button

- Add An “A Record” To Your Zone File With The IP Address Obtained From BlueHost
For my earlier example, I would enter in 50.87.248.203

Voila!
If you followed all of the instructions above, you should have a Shopify or BigCommerce store at http://yourdomain.com and a WordPress blog located at http://blog.yourdomain.com.
This is the most flexible way to run a blog in conjunction with your Shopify or Big Commerce store.
But if you are on an open source platform like I am, you should install your blog in a subdirectory such as http://yourstore.com/blog/.
Good luck!


Post a Comment